Now I'm a big fan of fantasy being able to break rules from how the real world works. After all, in a Fantasy universe gods, magic, and monsters are all provably real. But it is also nice to have a grounding in at least the basic aspects of our world. If nothing else it pre-emptively solves problems. You don't need to figure out where is dry - and why it is dry - when you know how the winds generally travel in your world. And so working with my friends over the course of about two hours we made the following world, and I figure I will present it step by step so you can see how it went.
A Note on Program and Images
The software used for all this world building is Wonderdraft. Wonderdraft is a wonderful map making tool that will let you produce good looking maps very fast. I am unsure about the legality of using Wonderdraft for commercial uses, but as I am not using it for such I am also not worried. Your mileage may vary though, so be warned.
Continents and Tectonics
The first step was getting the continents and tectonics. Setting Wonderdraft to 'World' for terrain generation and hitting the generate button a few times after setting a desirable water level gave some RNG continents. From there, with discussion of friends, we figured out how these continental landmasses were likely moving on the underlying tectonic plates, and sketched out lines for our simplified tectonic plates running beneath everything. That ended up looking like this.

For a simplified view of how the Earth's tectonic plates look. You can click this link. Also, you can find out more about Plate Tectonics here.
Mountains and Glacial Drifts
With our continents and tectonic plates set, the next step was to figure out where our mountains were. Mountains come from three main sources: Volcanic activity, tectonic plates pressing against each other, and glacial drift. Tectonic plate activity is the big one that will get you long ranges. They tend to appear close to the borders where tectonic plates are pushing together, but they can also appear a little off the border at times as well.
Glacial drift on the other hand tends to make smaller mountains than tectonic activity. Glacial drift mountains come from glaciers moving from the poles towards the equator. They form in semi-circles and waved lines as different glaciers pushed down further than others before retreating back as the ice age ended. These mountains tend to be either perpendicular or parallel with tectonic mountains depending on the plate alignment. Though as this is not being done with a ruler, you'll get off angles.
With our mountains we ended up with this map. Please ignore the faded lines, we'll get to them soon:

Placing the Equator and Wind Direction
Part of glacial drift mountains is the equator. The equator is the 'mid point' of the world. Basically the part that is generally balanced and inline with the sun or main day star for consistent light and heat. At least to my basic understanding. Where these continents fall on a globe will vary depending on where the equator is placed. And as a note, this is a very small world. About as far across as the United States plus some ocean. So less than half the width of the Earth. That could mean this is just a chunk of land or not depending on your whim. Anyhow, we set the equator a little off center to the north. It came out with the bold orange/yellow line.

After that was Wind Direction. The main wind currents will push weather and currents around. The weather tends to go one way in the upper hemisphere, and the other way in the lower hemisphere. Also worth noting is that when the wind hits an obstruction (like say a mountain range) it will split to go around the mountain as wind, like almost everything else, seeks the path of least resistance. This is shown with the arrows coming off the main lines.
Also, I remembered to render the raised area on that large chunk of south eastern land. The idea behind this is it raised due to underlying volcanic activity pushing a chunk of land up. This creates its own warm from geothermal events and makes for a "special" place to have some fun with. As well as a great place to place dinosaurs, lizard people, and all those other fun saurian creatures. Our wind map comes out looking like this.
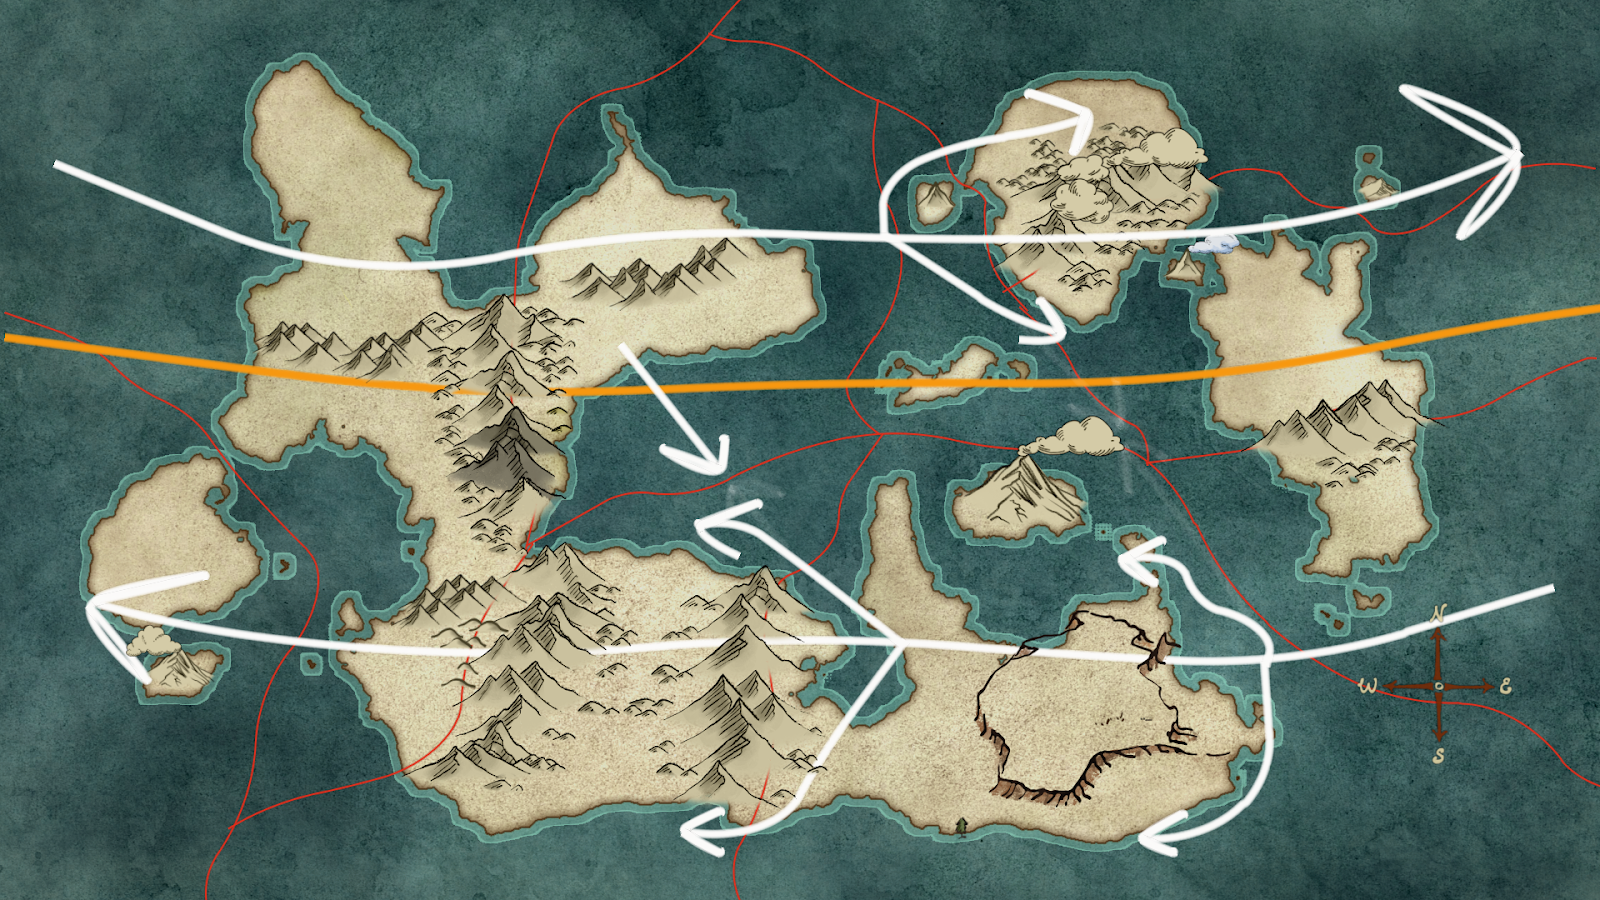
Note the two places over water where lines come right at each other because of the mountains. One is near dead center in the map. The other is by the large volcano in the central/eastern section. Those are going to be the birth places for large storms and hurricanes. Should make for some fun and turbulent waters.
Rivers, Trees, and Grass
We have our equator. Further from the equator means colder in general. We have our wind lines to show which way the weather will travel, where it will have to break around mountains and where it will have a hard time reaching.
Traveling over water will help storm fronts pick up power that they will lose as they go over land and 'dump their load' so to speak. This could end up with lower, flatter terrain due to erosion, as well as more marshes and swamps. As it kind of tapers off its higher strength we'll get forests. Mountains can shield entire sections of land, denying them a lot of rain or otherwise climate can be directed around an area resulting in natural arid areas such as deserts.
There are also rivers to consider. Rivers will go from high land areas (i.e. mountains and places near mountains) to low land areas. Rivers will also converge as they get closer to the coast. As this is a far back, zoomed out view we only need to worry about major rivers. We can assume smaller rivers and tributaries are spread out feeding the rest of the land, forming as rain rolls down hill and erodes the land away, and otherwise marks out the path of least resistance.
With all that, we get this:

Finally, Cities and Settlements
Finally we set down our cities and settlements. Again, this is a zoomed out view so we only concerned ourselves with major cities. Capitols for kingdoms and countries, and major trade hubs or resource nodes. The circle markers with stars in them are capitols. The circles with dots in them are major trade hubs. The dots are other major settlements usually for resource gathering or way points.
Cities tend to form on nexus points and trade ways. This is why you'll see them on coasts and along rivers. The biggest cities will tend to be there where things can easily happen. Then as people move in land other settlements will pop up along the way, with the largest ones forming at the most useful places to reach resources around them - including passages to other major cities for trade.
Finally, this being a fantasy universe we marked some settlements in deep forests and on the mountains. Difficulty in getting to these places prevents a lot of cities forming in them in the real world, but fantasy worlds are full of dwarves who make grand cities digging out the center of mountains, or elves who have vast settlements in virgin forests that are in perfect balance with the surrounding nature. This isn't to say these are the only places such settlements could be found, but we wanted to make note of a few of them at the least.
This gave us a finished map that looks like this:

Next Steps
For the original project we then had to drown the world, but I like how this map came out. There is a lot of potential merit in building this out and explaining things as is. If nothing else it gives the backdrop of what locations are. It builds the lore of the world which we then move forward with drowning things.
Next steps for that would include in no particular order:
- Name the cities, settlements and landmarks
- Figure out kingdom/country lines if any
- Determine settlement appearance/growth order if any
- Gods? Do we have them? Who are they?
- Central conflicts for the world, or areas of the world
But those are tasks for another day. For now, hopefully this shows one way of building a world. The whole process took less than 2 hours. And that included some going back and forth, and my friends very kindly and patiently explaining to me the very basics of aspects of how the world works.
Feel free to use the map for your own game if you'd like. Aside from a visual representation nothing about it is named or developed.
Feel free to use the map for your own game if you'd like. Aside from a visual representation nothing about it is named or developed.
No comments:
Post a Comment